BILL'S RAILROAD EMPIRE |
Bill's Easy Ballasting Method
Copyright © 2000-2017 Bill's Railroad Empire®
| PAINTING YOUR TRACK | BUILDING A TABLE |
Have you tried all the ballasting methods the books and the experts tell you to use and failed? I tried these methods also...more than once! Over the past twenty-five years, I've tried the "proven" methods, over and over and I've never had success with them.
I've tried diluted white glue, Woodland Scenics cement, a few drops of dishwashing detergent, and more. I never tried matte medium or alcohol, but I've read where some people have problems with these, too. Nothing worked!
I have used cork roadbed and instant roadbed. I've always used Woodland Scenics Ballast. I have done one HO layout and three N Scale layouts. What did I do to make my roadbed look like real railroad roadbed?
I'm going to tell you an easy method I've used with success. Photos are scenes on my N scale railroad--click on photos to view larger images. See if you'd like to try this method. It works well for N scale and can also be used for HO and other scales.
If you want to continue to try the bonded ballast methods that the "experts" all talk about, I suggest you use ballast that is heavier than Woodland Scenics ballast. I had problems with the ballast floating in the glue mix and have read where others have had the same problem.
Ballast offered by Great Northern Sand & Gravel Company or Arizona Rock & Mineral Co. and others should work well. These brands can also be used successfully with the method described here.
Or, you could use real rocks. Go out in the yard with a strainer, etc. Use a magnet to separate the magnetic material. Yes, some people do this! I've always been in a too much of a hurry to see the results of my railroad to take the time in the yard, or gravel pit, or the woods to do that.
Here's an easy method and after you're finished, your layout will be met with "ohhhs and ahhhs!" You'll want to tell the people, "Yes, simply mix a bit of matte medium with...." No! Don't fib! Tell them how you really did it!
We're going to put the ballast down before we put the track down...just like the real railroads do!
Note: This method can only be used before the track is down. If you've already put the track down, this method cannot be used.
Are you ready to ballast your roadbed? Let's go. Let's ballast the roadbed!
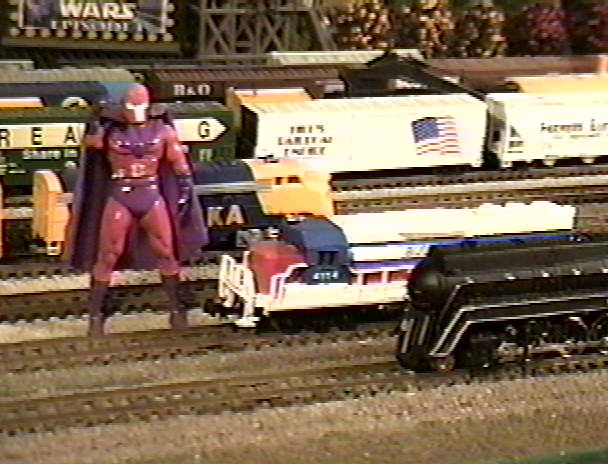
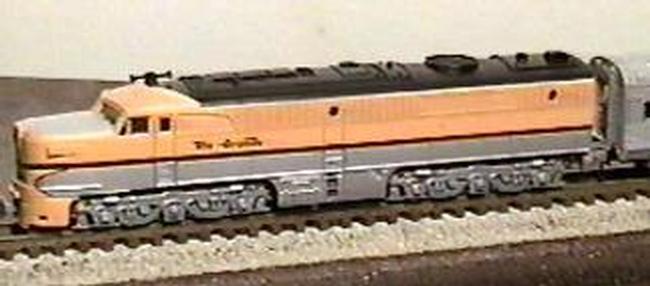
Ballasted Atlas Track on AMI Instant Roadbed. Tracks in foreground are gray/light gray mix, other tracks are light gray. Who is that masked man?
Since Woodland Scenics Ballast is sold almost everywhere and it does look nice, we'll use that brand of ballast. We're going to use cork roadbed. Cork has a nice profile and is receptive to the white glue mix. Photo at top of page has cork roadbed. Other photos have AMI instant roadbed.
I used AMI instant roadbed on my layout. If you use instant roadbed, use a little less water in the glue mix.
You'll need some Elmer's Glue All (or other brand of white glue) and a small brush. I found that a Testor's #8705 brush works best. It's a small flat brush about 1/4" wide. You'll have more control applying the glue mix with a small brush.
Dilute the white glue. A mix of two parts water to one part glue works fine, but you might want to experiment using a bit less water.
The Elmer's Glue All container is a good dispenser for the glue mix. Squeeze a small quantity of the mix on the roadbed and use the brush to spread it. You can do about a foot at a time. Experiment with this. Do a portion that is comfortable for you.
You want a good coverage of the glue mix. Not too much glue and be sure it covers all of the roadbed.
Put some of the ballast in a paper cup and crease the rim of the cup so you won't put too much ballast down. A small spoon can also be used. Now you're ready to spread the ballast on the wet cement.
If you use too much of the glue mix on the roadbed, the ballast will be uneven and not only look bad, but when you put the track down, the track will be uneven. That's why it is important to experiment first!
The good news is that since the glue is water based, it's easy to remove from the roadbed if it doesn't turn out right. Of course, it's best to do it right the first time!
You'll find that the ballasting goes along very quickly. Allow at least 24 hours for the glue mix to dry and vacuum up the loose ballast. Don't reuse the loose ballast that you vacuum.
Check for any uneven spots. You can scrape the excess ballast off these spots. If there are any bare spots, you can add ballast to them.
When you are satisfied with the results, you're ready to put the track on the roadbed. After you complete the layout, you can sprinkle a bit of loose ballast between the ties if you want. This will make the track look even nicer. Step back and admire your handiwork!
- What you'll need:
- Elmer's Glue All White Glue (or other brand)
- Testor's #8705 Brushes and/or other small brushes
- Woodland Scenics Fine Ballast (Medium for HO) or another brand such as
- Arizona Rock and Mineral Co. Ballast

Painting the Track
Painting your track and ties makes a world of difference in the appearance of your railroad. Believe me, it's well worth the time and effort.
I use Floquil Rail Brown paint on the track and ties. I found that I had more control by brushing the paint. You might prefer to use an airbrush or spray with aerosol. This is solvent based paint. Be sure to provide adequate ventilation.
After the paint dries, use a Bright Boy or other brand of track cleaning block to clean the railheads. I also use a fine sanding sponge on the railheads before I use the Bright Boy.
I have not had any problem with the track pitting using the sanding sponge to remove the paint. You want to be sure that all the paint is removed from the railheads.
A note of extreme caution! Be very careful when painting the turnouts (switches). You do not want any of the paint to foul the turnouts. Use masking tape to protect the points and the contacts as well as the switch motor.
The turnouts are best painted with a brush. I also painted my switch machines with the Rail Brown paint. They aren't quite as noticeable now.
Be sure the rail joiners are in place before painting the track. Poor electrical condutivity will occur if paint gets in the joiners. If you choose to spray the paint, you'll need to do it before ballasting the roadbed.
The photos show the painted track and ballasted roadbed (click on photos to see larger views). Looks nice, doesn't it?
- What you'll need:
- Floquil Rail Brown Paint #110007 or
- Floquil Rail Brown Aerosol #130007
- Testor's Assorted Brushes #8703 or #8706 (or similar)
- Walther's Bright Boy #949-521 (or another brand)
- 3M Small Area Fine Sanding Sponge (or other brand)
Note: I assume no responsibility for any damage that might result from the use of these instructions. I suggest that you experiment with these methods on a scrap piece of wood or foamboard before you do it on your layout. See if they work and look ok to you. The brands I mention are used as a reference only. You can use whatever brands you choose.
Coming Soon! Track Cleaning and Painting Accessories
Building a Table for Your Layout
  |
Click on Illustrations to Enlarge
Follow these instructions for a quick and easy layout table that is sturdy and will last a lifetime.
I've used this method for all my layout tables and it is based on the one found in the layout instruction books published by Atlas Model Railroad Co., Inc. with slight modifications.
All you need is a sheet of plywood and some 1"x4" boards, 6d common nails, 4d finishing nails, 2"x2"s (unless you decide to use the "L" leg assembly), and 1/4"x3" (or 1/4"x2") carriage bolts with nuts and washers. Buy good quality lumber for this.
This method is ideal for any layout up to 4'x8'. I like a height of 36"-42" but it's up to you to decide.
Note that there are no cross braces. The table is very stable without braces and you can even stand on top of it! The advantage of not using braces is that the underside of the table is accessible when you do the wiring and can be used for storage later.
The frame is constructed as shown with the 1"x4"s. The interior braces should be spaced about 18"-24" apart. Use 6d nails to hold it together. The top can be 1/4" or 5/16" plywood. Nail it to the frame with 4d finishing nails spaced at 6"-8" intervals.
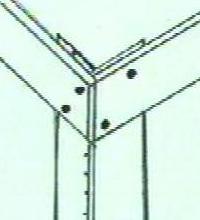
The legs can be 2"x2" lumber or make an "L" shaped leg assembly as shown in the illustration. Use two 1"x4" boards and nail them together with 4d finishing nails. The "L" leg assembly is a bit more rigid especially if the layout is more than 36" high.
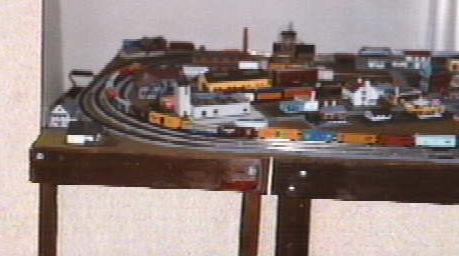 |
Table on left has 2"x2" legs. Table on right has "L" leg assembly.
The legs are attached to the frame with the carriage bolts. Use one 1/4"x3" carriage bolt on each side of the 2"x2" or if you used the "L" assembly legs, use two 1/4"x2" carriage bolts diagonally on each side.
You can paint the table with flat brown paint now or you might want to put a sheet of Homosote on it. The table is ready for your track now! I hope these instructions and illustrations will assist you in the construction.
I recommend the fine books published by Atlas such as "Introduction to N Scale Model Railroading," "Nine N Scale Railroads," and the HO layout books. These are available at most hobby stores or direct from Atlas Model Railroad Co., Inc. The entire Atlas library is also available on CD.
These instructions are for N scale but can also be used for HO or other scales.Good luck with your model railroad!
Updated 1/11/2017
Copyright © 2000-2017 Bill's Railroad Empire®
Contents of this web page including text, photographs, and page format are copyrighted by Bill's Railroad Empire with the exception of certain gif, midi, and wav files which are assumed to be in the public domain. Web Ring material and images have been used with permission.
Disclaimer: If any gif, midi, or wav files are copyrighted, kindly inform me and they will be removed promptly upon receipt of documentation.
Please do not link to any of my files without permission.
Bill's Railroad Empire® is a registered trademark
This web site is owned and managed by
billsrailroad.tripod.com
E-Mail: Bill's Railroad Empire